Archives Февраль 2024

Decoding Octane Ratings: Understanding the Basics of Fuel Performance

all about car octane rating

Octane rating, also called the octane number, is a measurement of fuel quality and its capacity to resist knocking or pre-ignition in internal combustion engines. A higher octane number indicates a greater ability of the fuel to burn effectively within the engine of the vehicle. 

Simply put, knocking, also known as engine knocking or detonation, is an undesirable occurrence where the fuel-air mixture in the engine’s cylinder detonates prematurely. This results in a distinct knocking sound and may potentially cause damage to the engine. This is where octane ratings play a crucial role.

When you look at petrol labels, you’ll typically find an octane number represented as a numerical value. The octane number indicates the fuel’s capability to withstand compression before igniting spontaneously. The higher the octane number, the more resistant the fuel is to knocking. This makes it suitable for engines with high-performance or high-compression requirements.

Common Octane Ratings at Fuel Stations 

Details on the octane ratings system
Regular, mid-grade and premium are the common octane ratings at fuel stations

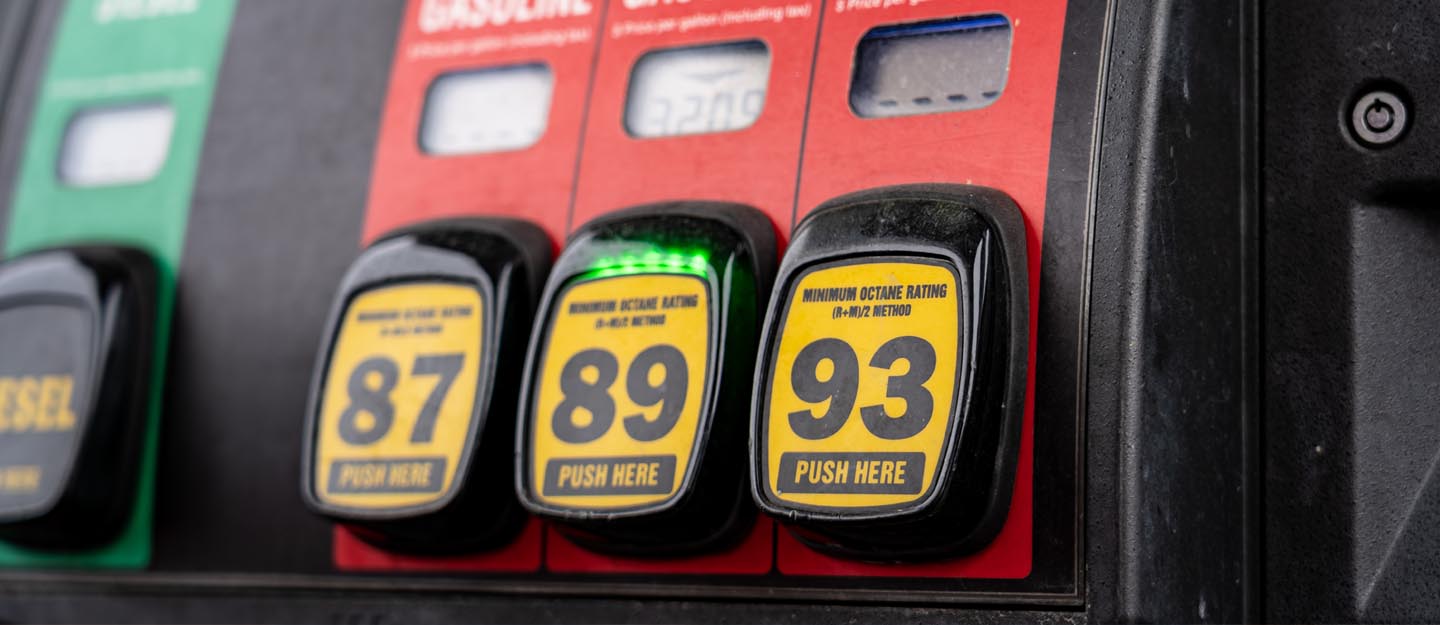
Common octane ratings found at petrol stations include:

Regular Unleaded Fuel: Typically 87 octane or similar. This kind of fuel is suitable for most everyday vehicles with standard engines.

Mid-Grade Fuel: Often around 89 octane. The mid-grade is an intermediate option for vehicles that may require a bit more resistance to knocking.

Premium Unleaded Fuel: Usually 91 or 93 octane. It is recommended for high-performance or turbocharged engines that prone to knocking at higher compression ratios.

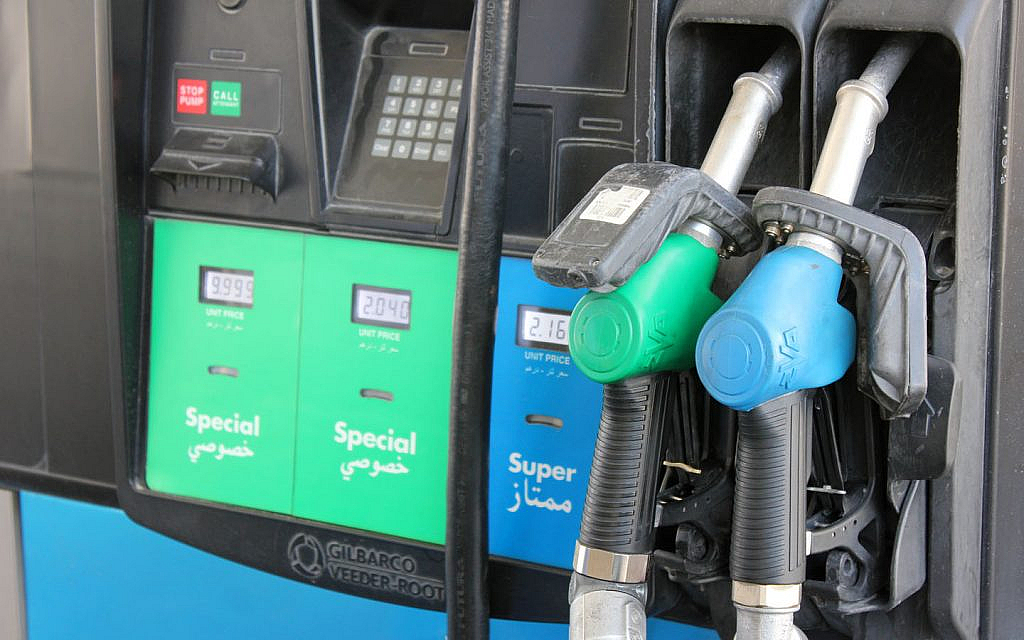
In the UAE, super 95 and super 98 have high octane. Here is a list of different types of fuel and popular fuel stations in Dubai.

Difference Between Pre-Ignition and Knocking 

The choice of octane (high or low) for fuel usage depends on the occurrence of “knocking” in the car’s engine. Within the engine, a mixture of air and fuel ignites through the spark plug. Concurrently, the piston moves upwards, compressing the air-fuel mixture and elevating its temperature (since pressure leads to a temperature increase).

When using lower octane fuels, the compressed air-fuel mixture can ignite prematurely due to this compression. When the resulting flame front collides with the flame front which is ignited by the spark plug, it creates an audible “knock.” 

This situation, where the air-fuel mixture ignites prematurely due to compression rather than the spark plug, is known as “pre-ignition.”

If fuel combusts before ignition, it burns incompletely, leaving residues inside the fuel chamber. This is one of the common car engine issues that eventually leads to the engine knock sounds.

To prevent pre-ignition and knocking from deposits, new vehicle manuals suggest the suitable octane rating for the fuel systems.

Why is Octane Rating Important

all about vehicle octane rating
Vehicle octane rating is important due to a couple of reasons

Octane number is important due to several reasons. Popular ones include:

Engine Performance

The octane rating has a direct impact on the engine’s performance and efficiency. High-performance and high-compression engines require fuels with higher octane ratings to avoid knocking and achieve optimal power output.

Knock Prevention

Engine knocking, or detonation, is a damaging phenomenon where the air-fuel mixture ignites prematurely owing to compression before the spark plug fires. This also makes the vehicle less fuel efficient. Higher octane fuels are more resistant to knocking. This ensures smooth and controlled combustion.

Engine Longevity

Knocking can lead to engine damage over time. By using the appropriate octane rating, the risk of knocking and subsequent engine wear is reduced, leading to better engine longevity and reliability.

Fuel Efficiency

Cars that are not fuel efficient lead to bad fuel consumption. However, fuels with the right octane rating allow the engine to burn fuel efficiently, leading to improved fuel economy and fewer emissions

Emission Control

Proper octane ratings contribute to better emission control in vehicles, as efficient combustion reduces the release of harmful pollutants into the atmosphere.

Flexibility

Using a fuel with an octane rating suitable for a wide range of engines ensures that the same fuel can be used across various vehicle types, simplifying fuel distribution and usage.

Engine Design

Higher octane fuels enable the design and use of more advanced engine technologies, such as turbocharging and higher compression ratios, which can improve overall vehicle performance.

Performance Vehicles

Performance-oriented vehicles, sports cars, and supercars often require high-octane fuels to achieve their full power potential and prevent damage to high-performance engines.

That is all about octane rating, its purpose and its function.  Please note that using a higher octane fuel than what your engine requires does not generally improve performance or efficiency. Modern engines are designed to run optimally on a specific octane rating, and using higher octane fuel in an engine that doesn’t require it won’t provide any significant benefits. 

On the other hand, using a lower octane fuel than recommended can lead to engine knocking and potentially damage the engine over time. Therefore, it is essential to follow the manufacturer’s recommended octane rating for your vehicle.

For more on fuel systems and their ratings, stay tuned to dubizzle’s top auto blog.

Share
Tweet
Pin
Share

All About Hydraulic Trunk Maintenance and Signs of Damage

Hydraulic Trunk Damage Signs & Maintenance

Automobiles have evolved significantly over the years. The more than century-old automobile history has witnessed the introduction of a plethora of advanced features and components. Features that once seemed like a daydream have now become a necessity for vehicle owners. One such feature is the hydraulic trunk. The component allows easy opening and closure of the trunk. However, much like other components, it is prone to damage.

Therefore, it is important to know hydraulic trunk damage signs & maintenance schedules for better outcomes. We will do a detailed overview of the hydraulic system maintenance checklist to help drivers take better care of the component.

What is a Hydraulic Trunk in Cars?

go through the Hydraulic Trunk Damage Signs & Maintenance to take better care of the system
In cars with hydraulic trunks, the system helps to easily open and close the trunk door

A hydraulic trunk, equipped with a hydraulic system is found at the trunk door. The hydraulic system reduces user efforts for opening and closing the trunk. As the hydraulic suspension system contributes to a smooth ride, the hydraulic trunk accounts for minimum efforts for operating the trunk.

The hydraulic trunk system consists of the following components:

  • Piston
  • Cylinder
  • Hydraulic fluid

Hydraulic fluid flows through the different hoses in the system. The flow of fluids helps to turn the hydraulic pump. In case of a damaged hydraulic system, the trunk will fail to open to close properly.

The hydraulic trunk can be of great help to people with limited mobility or health issues. In any case, it is important to know hydraulic trunk damage signs & maintenance schedule to ensure the longevity of the system.

Hydraulic Trunk Damage Signs & Maintenance

For all trips, long or short, the trunk plays an important role in luggage storage. The ample space proves to be a viable option for transporting goods. The trunk is also one of the places to look for hidden trackers in cars.

However, the advantage remains plenty and so does the need for timely maintenance. That said, let’s go through some common signs of damage in the hydraulic trunk of a car to watch out for.

SIGNS OF DAMAGE HYDRAULIC TRUNK IN A CAR

Listed below are some of the common signs of damage in the hydraulic trunk of a car:

UNFAMILIAR NOISE

one main part of the hydraulic system maintenance checklist is to keep a check on signs of damage
If you hear unfamiliar sounds when opening or closing the trunk door, this could indicate a damage

If there are unfamiliar sounds when opening or closing the trunk, these can indicate a problem. The noise can be big or small depending on the magnitude of damage to the hydraulic system.

THE TRUNK FAILS TO OPEN OR CLOSE

Whether using the car packing hacks to fit more items in the boot or using the trunk for any other purpose, if a trunk fails to open or close, this could indicate an underlying problem. Be sure to check the space is not overpacked. However, if the issue persists, the problem may lie in the hydraulic system.

HEAVY TRUNK

A trunk feeling heavier than before can also indicate an issue in the hydraulic system. The trunk may feel heavy in general or when closing or opening it.

TRUNK OPENING OR CLOSING ON ITS OWN

if the hydraulic system gets damaged, liquids may fall from the car
Liquids dipping out of the car may also point out an underlying hydraulic system problem

If the trunk opens or closes during the drive or when the vehicle is idle, it is also one of the indications of damage to a car’s hydraulic trunk. Moreover, if you see liquid spillage under the trunk area, have a mechanic look at it promptly.

Maintenance of Hydraulic Trunk in a Car

Knowing the hydraulic trunk damage signs & maintenance tips can help drivers take better care of the system. The aforementioned signs can help you identify issues. Let’s now take a look at some effective tips for the maintenance of the hydraulic trunk in a car.

ENSURE REGULAR CHECKUPS

Timely checks are important to keep the hydraulic system in running condition. Therefore, be sure to check the hydraulic trunk at regular intervals. Check the hoses, piston and hydraulic pump for signs of damage.

Moreover, damage in the trunk also remains one of the causes of water leaking from the car. Ensure proper lubrication of all these components. Use suitable lubricants as others might do more damage than good.

CLEAN THE SYSTEM

ensuring regular check ups is an important part of the Hydraulic Trunk Damage Signs & Maintenance checklist
Ensure timely maintenance to take better care of the hydraulic trunk system

When checking the hydraulic trunk, look for debris and dirt particles. With time, dust and dirt particles can build up on the hydraulic system. These can affect the system’s ability to function properly.

Therefore, drivers should ensure regular cleaning. Use a soft cloth or sponge, soak it in soap water and clean the parts. Avoid using harmful chemicals and high-pressure water on the hydraulic system.

Moreover, be sure to clean the hoses, pistons and hydraulic pump at all times.

AVOID FORCING THE TRUNK DOOR

Much like the must-have car features, a hydraulic trunk is there to ease driver efforts. That said, it is important to avoid putting excessive pressure on the trunk door. When opening or closing the trunk door, let the system do its job.

Don’t force the trunk door open or shut as it may cause damage to the system. Moreover, if there’s resistance when opening or closing the trunk door, take the vehicle to a mechanic for a proper inspection.

let mechanics take care of the hydraulic trunk issues if you are not familiar with the fixing process
If you are unaware of the fixing process, take the vehicle to a professional for a full inspection

This brings us to the end of the hydraulic trunk damage signs & maintenance checklist to follow. The hydraulic trunk is an important part of the vehicle. Particularly, for people with physical limitations as the advanced system eases the load.

Be sure to follow the maintenance checklist to ensure the smooth running of the hydraulic trunk. Moreover, don’t forget the ignored vehicle maintenance services to take better care of the vehicle.

Furthermore, learn some myths about car maintenance to avoid falling for false information.

In addition to the hydraulic trunk, modern cars come equipped with a plethora of features to make driving a breeze. Go through these pre-owned cars for sale in the UAE and select from a vast list of modern cars with advanced features listed.

Stay tuned to dubizzle’s auto blog for hydraulic trunk maintenance tips and more.

Share
Tweet
Pin
Share

Enhanced Off-Roading: All About Auto Lift Kits

All About Auto Lift Kits

When it comes to off-roading and all-terrain driving, the ground clearance of a vehicle plays a pivotal role. A higher ground clearance protects the car against undercarriage damage caused by bottoming out. This is why off-roading enthusiasts often opt for installing auto lift kits in their adventure vehicles. It is how they ensure that their rides steer clear of different obstacles in the desert and dirt roads.  

Let’s learn more about auto lift kits and their different types to understand how they work.

What are Auto Lift Kits?

auto lift kits in off-road vehicles
Auto lift kits are aftermarket modifications made to a car to alter its height and ground clearance

Lift kits are automotive components designed to give the desired vehicle a higher profile. They are not typically factory-fitted but are aftermarket modifications made to a car to alter its height and ground clearance. Auto lift kits enhance a vehicle’s drivability for various off-roading conditions. 

Parts used in such off-road modifications are carefully designed and rigorously tested to withstand all-terrain driving challenges. It is to ensure the safe and stable performance of a vehicle while cruising through unpaved roads. Car lift kits can be installed on utility trucks, SUVs and other types of off-road vehicles.

Types of Auto Lift Kits

Based on their features and functions, there are two types of car lift kits. Let’s take a closer look at both types to understand the difference between them.

Car Suspension Lift Kit

car suspension lift kit
A suspension lift kit can give a car as much as up to 9 inches of safe additional clearance

When a suspension lift kit is installed, the parts of the car suspension system are altered to increase its ground clearance. They typically include taller coil springs, longer control arms, extended shocks and other necessary alterations. A suspension lift kit can give a car as much as up to 12 inches of additional clearance. 

While a foot of extra height can be alluring, it may not be ideal for the vehicle. It might not be designed for such a height, which can impact handling and safety due to a disrupted centre of gravity. Therefore, most experts recommend limiting the altered vehicle ground clearance to 9 inches max.

Body Lift Kit

Unlike a car suspension lift kit, a body lift kit doesn’t involve altering suspension parts. Instead, it raises the vehicle’s body higher off the chassis by adding spacers or blocks between them. The typical height alteration range in a body lift kit is limited to between 2 and 5 inches.

Body lift kits may not significantly increase vehicle ground clearance but create more space between the body and the frame. This allows larger tyres to be fitted in much more quickly, giving the vehicle a higher and more aggressive stance. 

When comparing suspension lift vs body lift, remember that the latter is more affordable. Its installation requires fewer components and less effort. That said, opting for any one of these modification options depends on the driver’s preferences.

Pros and Cons of Auto Lift Kits

For those considering installing auto lift kits in off-roading vehicles, the following information will be resourceful. Here we’ve listed some noteworthy pros and cons of car lifting kits you should know about.

Pros of Car Lift Kits

advantages of car lifting kits
Vehicles with lift kits offer better towing capacity and traction due to wider tyres

Better Visibility

Off-road lift kits provide the advantage of improved visibility for drivers. By elevating the vehicle’s height, drivers can have a clearer view of the road ahead. It enhances safety and awareness during the all-terrain driving experiences. You can also adjust your car mirrors to maximise visibility.

Enhanced Ground Clearance

One of the obvious reasons behind installing lift kits is increased vehicle ground clearance. This allows off-road enthusiasts to be able to travel over different off-roading terrains without worrying about their vehicles bottoming out. Meanwhile, here are some handy tips for driving a lowered car safely.

More Towing Power and Better Traction

Vehicles that have lift kits put little stress on the shocks and suspension when used for the towing process. It naturally enhances their towing capacity, making the overall process safer without the fear of damage. Moreover, lifted cars often have larger tyres which offer better handling and traction in hazardous road conditions compared to standard tyres.

Improved Aesthetics

One of the most prominent benefits of installing a lift kit in cars is improved aesthetics. The higher the height of an off-road vehicle, the more aggressive it might look. Besides, a ride with a higher profile is something that off-road enthusiasts often take pride in. 

Cons of Auto Lift Kits

disadvantages of a lift kit
Improper installation of lift kits in vehicles can lead to various safety risks, including rollover accidents

Reduced Fuel Economy

It is among the major disadvantages of a lift kit. The increased weight, height and altered aerodynamics can lead to higher wind resistance, resulting in reduced fuel efficiency. Car owners need to consider this trade-off when deciding to lift their vehicles. That said, here are some effective ways to reduce your car fuel expenses.

Frequent Maintenance and Repairs

This is especially for those who install suspension lift kits. In such modifications, stock components are replaced with heavier and larger parts. The increased weight puts additional strain on engine and suspension components, often resulting in frequent maintenance checks and repairs.

Increased Safety Hazards

Improper installation of lift kits in vehicles can lead to various safety risks. For instance, extraordinarily heightened suspension dynamics often cause a disrupted centre of gravity and reduced stability. As a result, the chances of a vehicle toppling over at high speed significantly increase. Consider these safety implications carefully to install auto lift kits appropriately.

Issues with Manufacturer’s Warranty Claim

While lifting a vehicle may not completely invalidate the manufacturer’s warranty, certain aspects can become void. However, the manufacturer’s warranty also doesn’t cover damage or mechanical issues caused by the aftermarket lift kit. 

In such a situation, the warranty coverage can be denied, leaving owners liable to pay for any future maintenance and repairs. To understand more about what car warranty covers, read here.

This was everything to know about auto lift kits, their different types and functionalities. However, before starting to build a project car in the UAE, read this guide. It presents a walkthrough of the necessary steps and the local laws about vehicle modifications. Besides, auto enthusiasts must also know about these go-kart driving tips. It is a fun motorsport activity.

If you are in search of an off-road vehicle for your next adventure, browse these used cars for sale in the UAE and choose the option that is best suited to your budget and preferences. To experience off-roading adventures, you can book the services of these Desert Safari companies in Sharjah or in your respective emirate.

For more informative updates on car parts and accessories, keep reading the dubizzle auto blog.

Share
Tweet
Pin
Share

Auto Anatomy: Piston Rings

Piston Rings

Several car components play a crucial role in the engine’s functioning. Piston rings are such components that create a seal between the piston and cylinder wall. This seal is crucial for optimising engine performance by maintaining an accurate compression ratio and preventing loss of power.

Here are all the details about rings on the pistons, their working and function, types, materials and symptoms of bad rings.

The Function of Piston Rings

The primary function of piston rings is to create a tight seal between the piston and the cylinder wall. They are circular metal rings installed around the outer diameter of the pistons. Here are the main functions of piston rings:

Function and working of piston rings
The rings ensure proper compression and prevent any leak during combustion
  • The piston rings ensure that the compressed gases do not leak past the piston and escape into the crankcase, maintaining high pressure and promoting efficient combustion.
  • They prevent excessive engine oil from entering the combustion chamber and being burned with the air-fuel mixture. 
  • These act as heat conductors to transfer heat from the piston to the cylinder wall and dissipate it into the different engine’s cooling system types.
  • The rings help stabilise the pistons while moving up and down in the cylinder to prevent excessive vibration and ensure smooth engine operation.

The functions of piston rings depend upon the types and their material. Let’s find out all the details.

Material of Piston Rings

Piston rings are typically made from durable and heat-resistant materials to meet the demanding engine operation requirements. The most common materials used for rings include:

  • Cast Iron
  • Steel
  • Compression-Molded Graphite
  • Chromium
  • Molybdenum
  • Ceramic

Types of Piston Rings

piston ring types
The two types of rings on pistons are: oil rings and compression rings

Here are the following types of rings on the piston, and both serve a certain purpose:

Compression Rings

This type of piston ring is the top ring on the piston and serves the crucial function of sealing the combustion chamber. Their primary role is to prevent the high-pressure gases generated during the combustion process from leaking past the piston and into the crankcase. By ensuring a tight seal between the piston and the cylinder wall, compression rings contribute to the engine’s overall power and efficiency.

Oil Control Rings

The oil control rings regulate the amount of oil on the cylinder walls. They are positioned below the compression rings and perform two essential functions. 

First, the scraper ring, the top ring in the oil control ring set, scrapes excess oil from the cylinder walls during the piston’s downward stroke, returning it to the oil pan. Second, the oil ring expander or oil wiper ring, located below the scraper ring, helps to control the oil film left on the cylinder walls and ensures proper lubrication without allowing excessive oil into the combustion chamber.

Symptoms of Damaged Piston Rings

Damaged piston rings can lead to several symptoms in an internal combustion engine. The rings are crucial components that help maintain compression within the combustion chamber and prevent the leakage of gases. When they malfunction, it can cause various issues that may affect the engine’s performance. 

Some common symptoms of failed piston rings include:

damaged piston rings symptoms
If you identify the reduced engine compression or rough acceleration, damaged piston rings can be a reason behind them

Reduced Engine Compression

Damaged piston rings can result in decreased compression in the cylinders. That said, it results in loss of power and reduced engine performance. It is also a symptom of piston damage.

Increased Oil Consumption

When rings are worn, they may fail to seal the combustion chamber. It can cause oil to leak into the combustion chamber and get burned along with the fuel, becoming a cause of increased oil consumption.

Blueish-Grey Exhaust Smoke

Excessive oil consumption due to damaged piston rings can result in blueish-grey car exhaust smoke. It is a sign of burning oil alongside fuel in the combustion process.

Poor Acceleration

Reduced compression and power output can be one of the reasons for sluggish acceleration and poor engine response, especially during acceleration or under load.

Rough Idling

Rough engine idling or stalling can happen due to inconsistent compression levels caused by faulty piston rings.

Overheating

If the rings malfunction, the decreased compression and power output can cause the engine to work harder. It will lead to increased heat generation and become a potential cause of car engine overheating.

Piston Ring Installation Instructions

Piston rings installation
When changing the rings on the pistons, check if it is compatible with your vehicle’s specifications

When the piston rings wear out, here’s how to install the new ones to avoid the drop in engine performance.

  • Clean the pistons and grooves thoroughly to remove any traces of the old rings and carbon buildup.
  • Check the new rings for any defects and ensure they are the correct size and type for your engine. 
  • Coat the new rings with engine oil or assembly lubricant. 
  • Start with the bottom compression ring. Carefully insert it into the groove, ensuring it sits flat and level.
  • If you have an oil control ring with expanders, install the expander first into the lower groove and then the upper groove. Ensure that the expander ends meet but do not overlap.
  • Install the top compression ring into its respective groove.
  • Place the piston and rings into a compressor tool.
  • Once the piston is in the cylinder bore, ensure that the ring gaps are still correctly positioned as per the manufacturer’s specifications. You can use a feeler gauge to check the gaps.

It is a wrap to the comprehensive information about car piston rings. Although it is a small component, it plays a vital role in the engine’s performance and power. When buying a used car for sale in the UAE, ensure all components are working properly to achieve efficient car performance.

Stay tuned to the dubizzle cars blog to learn more about auto parts, their functions and symptoms.

Share
Tweet
Pin
Share

White Stuff Under Oil Filler Cap: What Causes It?

white stuff under the oil cap

When you open the oil cap in the engine bay for the regular oil change, you may find white stuff under the oil cap. While this car issue isn’t harmful, it indicates how one has taken care of the vehicle. It doesn’t indicate a serious concern. However, it requires an inspection to ensure other issues don’t persist.

It may indicate condensation or water mixing with the oil. Speaking of that, learning about the milky oil cap causes is essential to solve the issue. Let’s go through the creamy oil filler cap symptoms, the reasons behind it and how to fix the problem.

What Is the White Stuff Under My Oil Cap?

what causes white stuff under the oil cap
The milky stuff under the oil cap is harmless

While most issues may seem harmless, they can eventually give rise to common car problems negatively impacting the vehicle’s overall performance. A prime example of this is white stuff under the oil cap. However, if condensation is one of the causes of white stuff under the oil cap, water must have entered the engine, and it may cause several other problems.

Here are all the causes of yellowish or white stuff under the oil cap.

Condensation

In some cases, the white stuff under the oil cap is due to condensation or moisture accumulating inside the engine. It is more likely to occur in colder climates or during short trips where the engine doesn’t reach its full operating temperature, allowing water vapour to condense and mix with the oil.

Oil and Coolant Contamination

One possible cause of the white substance is coolant (antifreeze) mixing with the engine oil. It can be a symptom of car coolant leaking due to a blown head gasket, a cracked cylinder head, or a faulty intake manifold gasket. The coolant can enter the oil passages, leading to a white, milky appearance under the oil cap.

Excessive engine blow-by

PCV valve can cause white stuff under the oil cap
A malfunctioning PCV valve can also cause a yellow or milky substance to appear under the oil cap

It can be a symptom of worn-out piston rings or a faulty positive crankcase ventilation (PCV) system. Excessive blow-by gases can escape into the crankcase and cause the oil to become contaminated, leading to the appearance of milky stuff under the oil cap.

Leaking head gasket

Overheating is one of the causes of a blown head gasket. It can result in a mixture of coolant and oil, leading to a sludgy substance forming under the oil cap.

Incorrect oil type

Using the wrong type of car engine oil for your specific engine can cause issues, including the formation of sludge and emulsification. That’s why it is essential to choose the correct type of oil.

Symptoms of White or Milky Stuff Under the Oil Cap

this white stuff can result in car overheating
In extreme conditions, the car can overheat or lose engine performance

The white stuff under the oil cap can be associated with certain symptoms that may indicate underlying issues in the engine. Here are some common symptoms you might notice:

Overheating

If the white substance is a result of coolant mixing with the oil, it can lead to overheating of the engine. Coolant helps regulate the engine’s temperature, and if the levels drop due to a leak, you may see a fluctuating car temperature gauge. Moreover, it causes some common car issues due to excessive heat.

Loss of Engine Performance

Contaminated oil can hinder proper lubrication and reduce the engine’s performance, power or cause rough idling and decreased fuel efficiency.

Sweet Smell from Exhaust

If coolant is burning in the combustion chambers due to a head gasket leak, you may notice a sweet smell from the exhaust.

White Smoke From Exhaust

In severe cases, when the white stuff is formed under the oil cap, it can be the reason for white smoke from the exhaust. It indicates significant coolant leakage into the engine.

Fixes of White Stuff Under the Oil Cap

fixing the milky substance under the oil cap
Clean the engine, drive longer or replace the failed components causing white stuff

If you find a milky substance under the car’s oil cap, here are the possible fixes: 

Drive for a Longer Period

If the car doesn’t have any mechanical problems, you must start driving for a longer period. Since a short drive doesn’t allow the car to reach its optimal temperature, a drive for a longer time can help fix the building of white stuff under the oil cap.

Clean the Engine Bay

One of the essential benefits of cleaning the engine is it helps remove the residue, such as a milky substance, under the oil cap. Follow the tips to wash the car engine at home and avoid issues that may cause a bigger problem.

Repair or Replace the Head Gasket

A blown head gasket can be the cause of coolant and engine oil mixing. Therefore, replacing the head gasket can help fix the problem of white stuff under the oil cap.

These were all the causes and fixes of white stuff under the oil cap. When you buy a used car in the UAE, inspect the car completely. Check the engine oil cap and other components for any wear and tear before buying a vehicle.

Stay tuned to the dubizzle autos blog to learn more about minor and crucial car problems and how to fix them.

Share
Tweet
Pin
Share

Safety First: Tips to Use Automatic Car Wash Safely

Automatic Car Wash Safety Tips You Should Know About

A regular car wash routine is essential as it helps maintain a spotless vehicle. People often prefer washing cars by hand, but a thorough cleaning treatment is required often. This is when a car wash becomes necessary. You can either go for a manual or an automatic car wash.  That said, if you are choosing the latter, you need to be a little more cautious. The entire process is automated with little or no human involvement. For your assistance, here we have compiled a list of some handy automatic car wash safety tips.

Important Automatic Car Wash Safety Tips and Tricks

useful automatic car wash safety tips
Tips to use an automatic car wash safely

Before visiting the automatic car wash, take note of these tips for a safe and smooth car washing experience.

Prepare Your Car for the Automatic Wash

First thing first. Before undergoing a thorough washing and cleaning treatment, that too with machines, a vehicle should be prepared beforehand. Whether going for an automatic or a self-service car wash, the interior of the car should be sealed properly. Ensure the windows are rolled up and the doors are properly closed. 

Moreover, inspect your vehicle thoroughly for any holes, cracks or other damages on the exterior. No water should seep inside the car as it could sit there and lead to moisture damage. Here are a few handy DIY tips to remove water stains from car upholstery.

Furthermore, don’t leave the retractable side mirrors and antennas sticking out. Such equipment may get damaged during the cleaning process. Also, beware of the automatic car wash instructions if there are any.

Choose a Well-reviewed Car Wash

choose automated car wash service with good reviews
Look around for licensed car wash facilities with good reviews

Driving around urban centres and downtowns across the UAE, people come across many car wash options. This often leaves them overwhelmed with choices. However, one should not rush the decision and look for licensed car wash facilities with good reviews.

Whether you need a car wash in Dubai or other Emirates, you may find some well-reviewed options on the internet. Besides, you can always ask for recommendations in your social circle.

Look for Touchless Car Wash

Standard car washes across use fabrics and brushes that can cause scratches to a vehicle’s exterior. Sometimes those scratches can be pretty deep. Even if a car wash facility uses soft fabrics, they might still have the potential to rub dirt into your vehicle’s paint. It is one of the potential risks in automatic car wash.

On the other hand, a touchless car wash facility uses high-pressure water jets to clean vehicles. There are no brushes or pieces of fabric involved. One of the examples of touchless car wash is the steam car wash. This means there is little to no chance of scratches on the vehicle’s paint or exterior. Opting for such an advanced facility is one of the key safety steps for automatic car wash.

Engage Neutral Gear to Ensure Safety

don't apply brake for safety during automatic car wash process
The car should be in neutral gear while in the automatic car wash facility

After entering the car wash facility, position the vehicle correctly and take your foot off the brake. Each machine in a car is designed to wash and clean the car from a certain angle. Some car wash facilities have rolling tracks while others have conveyor belts. 

However, in both cases, the car brakes shouldn’t be applied. They block the wheels from moving on the conveyor belt, which can result in an accident, probably an expensive one. Instead, the car should be in neutral gear. It is one of the key tips to avoid automatic car wash accidents. Moreover, always keep a close check on car brake maintenance and its condition to ensure safety. 

Don’t Get Too Close to Any Equipment

Some people prefer staying inside the car during the washing process while others like to be out of the car. However, for those watching from the outside, it is better to stay clear of any washing or cleaning equipment. Those are industrial machines moving at full speed with full force. Anyone getting dangerously close to them may get injured.

Also, whether sitting inside the car or not, avoid any distractions when surrounded by such heavy machinery. Avoid using cell phones, indulging in any type of reading or listening to loud music. Moreover, to eliminate distractions from the outside, you can also consider soundproofing your car.

Make Sure It’s Safe to Exit the Car Wash

tip to safely exit the car wash
Only exit the car wash when the path is clear

Once the cleaning and washing process is over, don’t exit the car wash in a hurry. There may be obstacles underneath or in front of your car, which you would never want to drive over. Therefore, it is better to wait for a signal or an indicator to make sure the exit path is clear. Make sure to make this step a part of your automatic car wash safety checklist.

Inspect Your Car Thoroughly After Wash

Before leaving the facility, walk around the car and take one good look. Spot any damages or scratches that may have occurred during the process and report it to the facility management.

These were some noteworthy automatic car wash safety tips. The aforementioned precautions are crucial to ensure a smooth and safe car wash visit. Meanwhile, if you are looking for an effective DIY detailing technique, follow these steps to clay bar a car.

After buying a used car in the UAE, it would be a good idea to take it to a car wash for a thorough cleaning treatment. However, keep in mind all the precautionary measures discussed above to avoid any untoward situations when choosing between automatic and manual car wash. 

For more car service and repair tips, stay connected with dubizzle’s auto blog.

Share
Tweet
Pin
Share

What Does the Air Recirculation Button Do?

what does air recirculation button do in your car

Automobile brands continuously experiment with new features to facilitate the users. Some of these features are excluded after the trial phase and some become standard in vehicles. One such standard feature is the air recirculation present in almost all vehicles. The air recirculation button is present on the dashboard near the AC controls. However, not many vehicle owners are aware of its usage and it often goes unnoticed. 

Here we have mentioned the purpose and usage of the air recirculation button in cars in more detail.

What Is Air Recirculation Button in Cars

As the name suggests, an air recirculation button is used for maintaining cabin temperature by re-using the air already present inside the vehicle. Generally, a car cooling system sucks air from the environment and pumps it in to maintain a flow of air. However, when the air recirculation button is turned on, it cuts off the external air flow and uses the air already present in the cabin. 

Turning on the air recirculation button
Turning on the air recirculation buttons reduces the cabin temperature without stressing out the AC

Car Air Recirculation Button Purpose

Air recirculation button plays a significant role in vehicle temperature control, especially in the UAE climate. Mentioned below are some core purposes that the air recirculation button serves in the car. 

Cool Down Cabin Rapidly

Since the air recirculation feature does not absorb air from outside, it can cool down the car cabin rapidly. In the recirculation mode, the already cooled air is reused by the AC which helps in reducing and maintaining the car cabin temperature efficiently, regardless of the external temperature. 

The air recirculation button is especially helpful during the summer days. Once the air recirculation button is turned on, it maintains the temperature without stressing out the car AC or climate control system. 

Defog Windows

The temperature of the car cabin and the external environment are different. Therefore, when the external air is pumped and cooled down in the cabin, it fog up the windows. That said, one way to remove fog from car windshields and windows is to turn on the air recirculation button. Since the air has already cooled down, it will not fog up on the screens, resulting in a hassle-free drive. 

Aside from air recirculation, here are some other car defoggers that you can use to get rid of fog from windows and windscreens.  

Maintain Temperature

The core benefit of using the air recirculation button is temperature maintenance. Generally, in hot climates, the continuously running AC is exhausted from cooling the air, resulting in car AC failure. Here is when the air recirculation comes into the picture. 

To prevent car AC from exhausting, air recirculation allows the reuse of the air that is already cooled down. Therefore, the cabin temperature is maintained for a longer period without stressing out any car AC part. 

Besides, if you still have AC issues, here are some car AC repair shops in Dubai that you can opt for. 

Reduce Energy Consumption

Reducing the cabin temperature and maintaining it can consume a lot of energy, especially in electric cars. Using the air recirculation button prevents the excessive usage of AC leading to reduced energy consumption. 

Aside from using air recirculation, here are some other fuel-efficient driving habits that you can leverage. 

Using the air recirculation button
Air recirculation uses already cooled and filtered air which reduced the energy consumption of the vehicle

FAQs

What does the air recirculation button do?

The air recirculation button cuts off the supply of external air and circulates the already present cabin air. Since the cabin air is filtered and cooled down, it reduces stress on different car components and also cools down the cabin rapidly. 

Can I use air recirculation on long drives?

It is recommended not to use the air recirculation continuously for a longer period. Turn off the air recirculation button for a few minutes and let fresh air in the cabin. 

Where is the air-recirculation button present in cars?

The air-recirculation button is often present on the dashboard next to the AC control. To turn on the air recirculation, your car might have a knob or buttons with a logo of the car and U-Turn air. 

These were the core purposes of the air recirculation button in cars. The air recirculation is a simple yet efficient feature that can significantly affect the car cooling process and cabin temperature. Therefore, if you are still driving a car with a non-functional air recirculation system, it’s time to switch. Here are some used cars for sale in the UAE that you can browse and choose an appropriate car for yourself. 

Stay tuned to dubizzle’s auto blog for more information on air recirculation button advantages.

Share
Tweet
Pin
Share

Unlock the Secrets of Vehicle Reconditioning: When and Why You Should Consider It

all about vehicle reconditioning

Vehicle reconditioning involves used car restoration to enhance its overall appearance and performance. Although maintenance and cleanliness are essential aspects of car upkeep, reconditioning goes beyond that. This process addresses significant issues with the car’s appearance, such as surface dents and mechanical problems like a failed engine. 

In essence, car reconditioning aims to return a used car to its pre-damaged condition, ensuring it looks and functions as close to its original state as possible.

Cases That Require Vehicle Reconditioning 

Vehicle reconditioning process explained
Restoration elevates the aesthetic appeal and repairs mechanical matters of a vehicle

Reconditioning a vehicle entails a thorough cleaning of both its interior and exterior. Professionals assist in eliminating scratches and dents as well as rectifying any mechanical issues prevailing in the car to bring it back to a reconditioned state. Following are the common cases where a vehicle requires reconditioning. 

After an Accident 

Vehicle reconditioning is necessary in case of an accident. After a collision, cars suffer from intense damages, including dents on the exterior and cracks or shattering of lights, windows and windshields. 

A major accident can also damage the car’s interior. Besides, it is not safe to drive around in such a vehicle. This is where vehicle reconditioning becomes necessary. Moreover, reconditioning is mostly not always cheaper than buying a new car. 

That said, if the car has been damaged beyond repair, you can always opt for a used car. Sift through this list of pre-owned cars for sale in the UAE and select the one that best fits your driving style and needs. 

Before a Resale 

Car reconditioning becomes crucial, especially when you intend to sell your vehicle. A considerable number of people prefer purchasing used cars due to their economic yet functional appeal.

Reconditioning your car before listing it for sale helps retain the resale value. Any dents, scratches, cigarette burns, upholstery stains, or mechanical problems can significantly reduce your car’s worth. 

Investing in vehicle reconditioning can turn out to be a valuable decision for individuals aiming to sell their cars at a more favourable price.

To Fix Wear and Tear

Vehicle reconditioning steps involve fixing the car’s wear and tear
The process of reconditioning removes wear and tear and gives a vehicle a fresh, immaculate look

Cars are continuously exposed to various weather conditions and the elements encountered on the road. The intense sun heat, rain, storms, hail, and snow all take their toll on a car’s finish
over time. These external factors contribute to the appearance of scratches and dents on the vehicle. If left untreated, these imperfections can lead to rusting. Here is a list of different car dents and how to remove them.

Additionally, years of driving result in the accumulation of dirt and grime in the car’s engine, which may necessitate the replacement of some engine parts. This is why vintage car maintenance is necessary. For minor engine cleaning, a DIY engine degreaser is recommended. However, thorough cleaning of the entire engine bay requires a proper step-by-step process. Go through this detailed guide to clean the engine bay effectively before starting the process.

Considering all these factors, taking your car to a professional for vehicle reconditioning not eliminates accumulated damages on the vehicle’s surface but also gives your car a fresh and immaculate appearance.

To Restore a Vintage or Classic Car 

Vehicle reconditioning steps involve restoring a vintage car
Car enthusiasts recondition classic vehicles

Car enthusiasts often venture into purchasing vintage or classic cars with the intention of restoring them to their original, pristine state. Here is a list of places to buy classic cars in Dubai. The driving force behind this endeavour is usually either to resell the vehicle at a profitable price after reconditioning or to preserve it as a cherished addition to their vintage car collection.

Vintage cars that are untouched for decades can accumulate layers of dust both on their exterior and interior. Reconditioning such a car before putting it up for sale helps command a higher resale value. For avid car collectors, the process of reconditioning transforms the vehicle into a valuable and worthwhile addition to their cherished collection.

In certain cases, classic cars may find themselves in an appalling state due to years of neglect. This neglect could manifest as a malfunctioning engine or other major mechanical issues, along with damages to the car’s exterior and interior.

Consequently, the restoration of vintage cars becomes a labour of love and a passion project for dedicated car enthusiasts. Go through this classic car maintenance checklist if you are willing to recondition one. 

That is all about vehicle reconditioning and when it is needed. When done properly vehicle reconditioning helps give a whole new look and feel to your vehicle and also adds to its resale value. 

Stay tuned to dubizzle’s top car blog for more on car restoration and other processes that help maintain your vehicles. 

Share
Tweet
Pin
Share

DIY Engine Degreaser: Simple Recipes for Effective Cleaning

all about DIY engine degreaser

A clean engine is a major part of your car’s maintenance regime. It becomes easier to spot errors and fix them when the engine is kept in a neat and tidy condition. Most engine degreasers can be expensive, that said a DIY engine degreaser works as good as the one you purchase from the market. Let’s go through some easy steps for a homemade engine degreaser recipe. 

Step to Make a Homemade Car Engine Degreaser 

list of important steps to make a homemade engine degreaser spray
A homemade engine degreaser not only saves money, it also saves time

One way to save money on your vehicle is to adopt lots of DIY methods. For instance, taking care of your car at home and not taking it to the auto shop for maintenance often saves on money and time. 

As for vehicle maintenance, engine cleaning is an important part of the process, a vehicle is only as good on the road in terms of performance as its engine. Keeping the engine clean helps it to run smoothly and spot likely problems including leaks. Moreover, hoses and wires usually last longer when kept clean. However, engine cleaning can get expensive with commercial products. We have curated some quick and easy steps to make a DIY engine degreaser.

Washing Soda

To create an effective homemade engine degreaser, start by combining a gallon of warm water with a quarter cup of washing soda. Washing soda, which can typically be located alongside laundry items in most stores, shares similarities with baking soda. Although baking soda can be used as a substitute for washing soda, it won’t provide the same level of engine cleaning effectiveness. Here are the benefits of cleaning a car’s engine.

Ammonia Degreaser

Ways to degrease your engine at home includes making a DIY engine degreaser
Mixing ammonia, water and dish soap is an effective method to make a DIY engine degreaser

Another method to make a highly efficient homemade engine degreaser is to combine two parts ammonia, two parts water, and one part liquid dish soap. Ensure that the mixture is well blended in a spray bottle, and use it to spray and scrub the engine as needed. Rinse the engine thoroughly after application. A car’s engine bay cleaning is also necessary to protect the engine and a degreaser helps with just that.

Kerosene Degreaser

You can also make an alternative DIY engine degreaser by combining one part kerosene with four parts water and incorporating a small amount of liquid dish soap. While kerosene can be used alone as an engine degreaser, the addition of soap serves as a surfactant, enhancing the breakdown and helps eliminate grease and dirt from the engine. It is important to exercise caution when working with kerosene due to its flammability.

General Instructions for DIY Engine Degreaser Application 

always wear gloves before starting the different ways to degrease your engine at home
Always wear gloves before you start degreasing the car’s engine

When working on an engine, it is vital to exercise caution. Prior to beginning any work, ensure that the engine is turned off and has adequately cooled down to prevent any potential injuries. It is important to avoid working near the fan to avoid any accidents. For optimal coverage, use a spray bottle to apply the DIY engine degreaser, and remember to wear protective gloves at all times. 

When scrubbing smaller areas, it is recommended to use a firm brush. Keep in mind that cleaners potent enough to remove grease on their own may also pose a risk of damaging sensitive hoses and wiring. Finally, after using the homemade engine degreaser, always perform a thorough rinse to ensure its complete removal.

That is a wrap on the steps to make a DIY engine degreaser. In addition to car maintenance, degreasing the car’s engine is necessary for proper heat dissipation. It helps maintain the car’s resale value and prolongs the engine life and performance. Moreover, if you want to wash the engine, go through these tips to wash a car’s engine. 

Besides, if you’re still looking for a car to drive, here is a list of used cars for sale in the UAE. You can find different cars with various engine options, go through them thoroughly and have your pick. 

Stay tuned to dubizzle’s top car blog for more on various car DIYs, tips and more.

Share
Tweet
Pin
Share

Auto Anatomy: Idle Air Control Valve

idle air control valve

An engine includes many components, each with a significant function to improve the car’s performance. One such auto component is the idle air control valve (IACV), also known as an IAC valve or Idle Speed Control (ISC) valve.

It is an essential component in modern fuel-injected internal combustion engines. It regulates the engine’s idle speed and maintains stable and consistent idle RPM when the throttle closes, or a car decelerates.

Let’s find out how the idle air control valve functions and the types and symptoms of a bad idle air control valve.

Idle Air Control Valve Working

Function of IAC valve in cars
The IAC valve receives signals from ECU and controls the idle speed by supplying the right amount of air

The primary function of the idle air control valve (IAC) is to regulate the engine’s idle speed by controlling the amount of air that bypasses the throttle plate. When the engine is running at idle, the throttle plate is typically closed, restricting the airflow into the engine. 

However, a certain amount of air is necessary for the engine to continue running smoothly at idle. The IAC comes into play here, allowing the engine control unit (ECU) or car computers to adjust the amount of air entering the engine without altering the throttle position. Besides, here are the signs of bad engine control module.

Here’s how it functions:

  • The IAC responds to signals from the ECU, which constantly monitors various engine parameters, such as engine temperature, load, and air intake. 
  • These inputs help calculate the required amount of air needed for stable idling.
  • The movable pintle or valve opens and closes an auxiliary air passage, allowing air to bypass the closed throttle plate and mix with the fuel in the intake manifold. 
  • By adjusting the pintle’s position, the IAC can fine-tune the amount of bypassed air and, consequently, the engine’s idle speed.
  • The IAC compensates for the electric load fluctuations by adjusting the idle speed, ensuring the engine remains stable and doesn’t stall. 
  • During cold starts, the IAC provides additional air to support the enriched air-fuel mixture until the engine warms up.

Idle Air Control Valve Symptoms

Symptoms of a bad idle air control valve
When the IAC valve wears out, it leads to many symptoms, such as fluctuating idle speed

A malfunctioning or failing IAC can lead to various noticeable symptoms in a vehicle. If you experience the issues, such as high or low idle speed, it is a sign of a bad idle air control valve. Here are the ways to check idle air control valve functioning:

Fluctuating Idle Speed 

An unstable or erratic idle speed is the most common symptom of a faulty IAC. The engine may rev up and down unexpectedly at a stop or struggle to maintain a consistent idle speed. If the vehicle’s engine is idling at a speed of more than 1,000 RPMs, it’s probably too high. Also, remember that vacuum leaks can cause a higher idle speed. 

Use an onboard diagnostic (OBD) scanner. If it shows a P0507 code, it can be due to the high RPM generated by the idle air control valve.

Stalling

Besides high idle speed, a failing IAC is a cause of the engine stalling when idle, especially when coming to a stop or during deceleration. The inadequate control of the idle air can lead to a lean air-fuel mixture, causing the engine to shut off.

Rough Idling

The engine may exhibit rough or lumpy idling, with noticeable vibrations and a lack of smoothness. It may feel like the engine struggles to maintain a consistent idle speed. That said, it can be one of the reasons why the car vibrates when idle.

Difficulty Starting

A malfunctioning idle speed control valve can cause a car to take longer while starting the engine, especially when the vehicle is cold. This symptom is more apparent during cold weather conditions. It may also be a reason why a car shakes when starting then dies.

Poor Fuel Efficiency

If the IAC is not functioning correctly, it may allow too much or too little air into the engine, affecting the air-fuel ratio. This rough car engine idling can result in reduced fuel efficiency and increased fuel consumption.

Check Engine Light

A malfunctioning IAC can trigger the vehicle’s onboard diagnostics system and become the reason behind the check engine light turning on the dashboard. Retrieving the trouble codes through an OBD scanner can help pinpoint the IAC as the potential issue. You can find an important car diagnostic code, P0505, for a malfunctioning idle air control valve using an OBD scanner.

Process-1: How to Test IAC Using a Multimeter

You can check the IAC valve’s electrical circuit by performing a resistance test using a multimeter. This test will help determine whether the IAC’s windings are within the specified range. Here’s how to do it:

  • Disconnect the electrical connector from the IAC.
  • Set your multimeter to the ohms (Ω) setting.
  • Touch the multimeter’s probes to the appropriate pins on the IACV’s electrical connector. Refer to the vehicle’s repair manual for the correct pinout and resistance specifications.
  • Compare the measured resistance with the manufacturer’s specified range. If the resistance falls outside the recommended range, the IAC valve may be faulty and require replacement.

Process-2: How to Test the Functionality of IAC

Checking idle air control valve
You can check the IAC valve using a multimeter or performing a functionality test

To check if the IACV is functioning properly, you can perform a functional test:

  • Reconnect the electrical connector to the IAC.
  • Start the engine and allow it to warm up to normal operating temperature.
  • Disconnect the electrical connector from the IAC with the engine running, 
  • Observe the engine’s behaviour. If the idle speed drops or the engine stalls after disconnecting the idle air control valve, it indicates that the IAC is functioning correctly. If there’s no change in idle speed or engine operation, the IAC may be faulty.

These were all the details about the idle air control valve. When buying a used car for sale in the UAE, check the car’s idle speed alongside the road test to determine the issues.

Stay tuned to the dubizzle autos blog to learn more about crucial car parts and components.

Share
Tweet
Pin
Share